Table of Contents
ColLab Garden
TITLE: Co-Creating The Future Of The GFL Greenhouse
Ali Akuri-Eyambe - 29630
Anna Pogrebnyak - 30850
Ayday Myrzabekova - 33796
Hoi-Fung Sam - 30875
Simge-Naz Sari - Simge-Naz.Sari@hsrw.org
Yana Diachenko - Yana.Diachenko@hsrw.org

Fig 1 - Farmbot in greenhouse(1)
1. Introduction: (Hoi-Fung Sam)
1.1 Aim of the project
Green Fab Lab faced the challenge of flooding due to heavy rainfalls. The issue of flooding affected the operation of greenhouses in the garden. To address this problem, cleaning and flooring were done to remove excess weeds and for better drainage. After that, a FarmBot was implemented for precision agriculture. The FarmBot required electrical, ethernet, and water supply lines. In addition, various sensors were installed to monitor environmental conditions to improve plant growth. This report outlined these steps to tackle the flooding issue and achieve precision farming.
This project endeavored to automate the plant nurturing processes within the greenhouse. During the winter, the greenhouse was not just plagued by bad weather which hindered plants from growing but also other inconsistent conditions like temperature and humidity contributed to it. Additionally, consistent monitoring of the plants and their respective needs was difficult as the botanists in charge had several other responsibilities. The project hence aimed to take over all plant nursing responsibilities while being able to be monitored and controlled remotely.
1.2 The Flooding Issue
To solve the flooding issue, it was important to understand the precipitation patterns around the area in Kamp-Lintfort. The supervisor provided a GitHub repository, and the analysis of rain data was carried out by modifying the existing code.
The daily rain data of three weather stations, 01590-Geldern-Walbeck, 05733-Xanten, and 13670-Duisburg-Baerl, were downloaded from Deutscher Wetterdienst (DWD).
The combined data was first shortened in the recent 5 years, and the value of total precipitation was summed up to get the monthly data. After that, the highest value of each year was selected, and finally, the most precipitation month for each year was known. The daily average precipitation that fell on the greenhouse roof area was calculated as 338.0 Liters. For the details of the code, please check out the GitHub.
2. Methods: (Anna Pogrebnyak)
2.1 Overview of the processes
2.1.1 Planning
At first, we outlined all the main provisions and stages of work that needed to be done to achieve the goal – to improve the greenhouse. Since our work consisted of several stages, our team needed to request tools such as shovels, gloves, boots, measuring tape, mats for covering the floor, and soil for plants.
2.1.2 Cleaning
Since there were already various plants in the greenhouse, it was essential to clean the space from them. That step became necessary due to the number of weeds and grasses. Plants such as peppers were planted in pots, and it was necessary to move them to another place because they interfered with the cleaning stage and laying the floor with mats. At this step, we used shovels, trolleys for transporting plants and garbage, rakes, gloves, and hoes.
Figures 2 and 3 show the progress of cleaning both from the front and the side view


Fig - 2 Progress of Greenhouse before and after cleaning (Front view)


Fig - 3 Progress of Greenhouse before and after cleaning (Side view)
2.1.3 Flooring
At this stage, we faced difficulties. Due to the unpredictable and rainy autumn weather in Kamp-Lintfort, the greenhouse got flooded, and the paths were completely submerged in water. To address this issue, we utilized soil from Group 3, which was in charge of the pond. Since the paths were entirely underwater, leveling the ground to proceed into the greenhouse and moving the soil around the perimeter of the greenhouse became challenging. It took us 2 weeks to complete this stage. Consequently, the heating system was additionally installed in the greenhouse, contributing to the drying and hardening of all the paths. At that time, only 6 floor mats were available, so completing this stage fully was not possible, and we awaited the next batch of floor mats. We utilized trolleys for transporting soil, gloves, boots, shovels, rakes, floor mats, and a heating system.
2.1.4 The FarmBot
The central driving tool of the project was the FarmBot. The model used in this project was the FarmBot Genesis XL version 1.6. It was chosen because of its multifunctional capabilities, ranging from planting a seed to nursing it to maturity. Additionally, it excelled in weeding and soil sensitivity measurement. Besides being autonomous in numerous functions, it was also built upon open-source data that could be modified based on preferences and needs. Its components all contributed to an advanced approach to farming, especially on an individual level. The progress in building the Farmbot was documented in the pictures shown below in Figure 4. Most importantly, the FarmBot could be assembled and used not just by technology experts but also by individuals with little to no experience in the field. Its main parts were the gantry with a Z-axis hand and the tracks for movement with cable carriers. It also had several tools for seeding, weeding, and watering placed in a toolbar at the edge of the plant bed. Finally, there was a main electrical box attached to it that oversaw all operations. A simple diagram showing the Farmbot view from all 3 planes could be seen in Figure 4.1.


Fig - 4 Building the FarmBot piece by piece by the team members

Fig - 4.1 Line Diagram structure of Farmbot
2.1.5 Plant bed Layers
The plant bed structure consisted of a wooden frame that was 4m long, 2m wide, and 23cm deep. The plant bed was slightly inclined on the left side to facilitate the flow of excess water to the side and out of the plant bed, and 3 wooden dividers were added to create 4 separate planting sections.
The 4 layers in the bed were a drainage net, pumice stones, a combination of perlite and black soil, and compost. The purpose of the plastic drainage net was to help in aeration while preventing water from stagnating at the bottom, which would not only damage the wooden floor but also cause water-related diseases to the roots.
Figure 5 showed the installation of wooden dividers and the plastic drainage net.


Fig - 5 Installation of drainage net and dividers
The Pumice stones were added to provide aeration to the soil, which helped enhance the soil structure, preventing soil compaction that created space for better drainage. In addition, because of its ability to trap and release substances, in this case, nutrients, it improved the nutrient exchange capacity of the soil, Abbu et al. (2023).2
Figure 6 shows a picture of the pumice stone layer (Left)
A mix of perlite and black soil was chosen as the second layer from the top because the porous properties of perlite allowed for aeration while the black soil helped with drainage and water retention. The perlite prevented soil compaction, while the black soil enhanced the overall soil structure while containing organic matter, which contributed to nutrient availability.
Figure 6 shows a picture of the Black soil and perlite combination (right)


Fig - 6 Pumice stones later (Left) and black soil and perlite combination (right)
Figure 7 showed the different layers of the plant bed. The top layer consisted of compost, chosen to create the best environment for small-sized seeds, which couldn't be planted too deep where they would face difficulties emerging to the surface. Moreover, the compost helped to maintain a stable pH. However, to accommodate plants with specific pH needs higher or lower than 7, the compost layer was half the size of the perlite-black soil mix layer. This was to allow the perlite to compensate for pH levels higher or lower than required where necessary, Compost Science and Technology (2007) 3

Fig - 7 The different layers on the frontal plane.
2.1.6 Electricity & Water (Yana Diachenko)
Firstly, we needed to provide the greenhouse with enough electricity to not just power the Farmbot but also other components like the electric heaters, the plant LEDs and the U6 mesh repeater. This required a 22m long and 50cm deep trench to be dug through the mapped out area as seen in Figure 8. It was the most excruciating part of the project. Once the trench was dug, we had to pass the electrical line through a protective cable duct. This part required us to be extra creative and a video of how we accomplished it was recorded in Vid_1 and Vid_2. The cable was then laid into the trench. And connect on the inside to an electrical hub This can be seen in Figure 8.
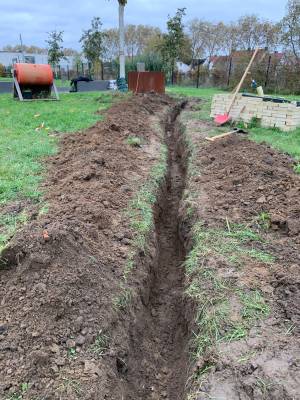
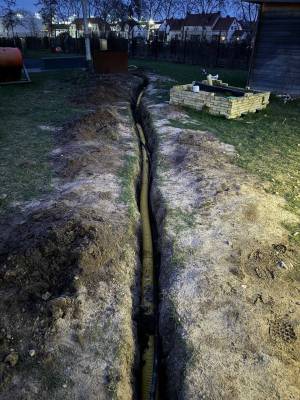
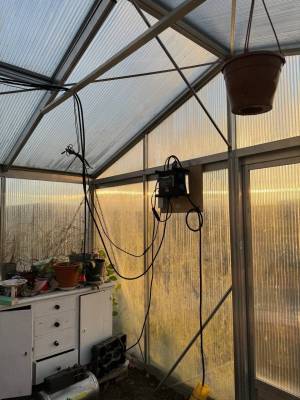
Fig - 8 Pictures of the Trench before the pipe (Left), after the pipe (middle) and the electrical hub (right)
The next was to establish a water connect with an inlet at the water source which was just beside the one for electricity, and an outlet in the greenhouse. Both were linked with a simple pipe equipped with a pressure equalizer. The mapping of both water and electric lines can be seen in Figure 8.1.

Fig - 8.1 A sketch of an aerial view of the underground piping line
2.1.7 Internet (Yana Diachenko)
In regards to bringing internet into the greenhouse, the main idea was to establish a network that was both strong and consistent. Upon analyzing similar projects for inspiration, the main idea used involved using a microcontroller connected to sensors that relayed data through the MQTT Protocol. 4 (Taha et al., 2018).
However, we chose to opt for the U6 Mesh from Unifi, which is a WiFi extender. The reasons for this were that the Farmbot already came with an assembled microcontroller that was pre-calibrated to perform the functions we needed. Additionally, we already had an established LAN, and creating an entirely new one specifically dedicated to the greenhouse would have proven very costly financially and time-wise, excluding the physical labor required to see it to completion.
2.2 Soil and Plants: (Simge-Naz Sari)
We wanted to test the capabilities of Farmbot, so we decided to plant more than one specific plant to see how Farmbot could perform with multiple variations of necessities.
Based on the measurement of the raised bed in Fig.9, the volume of the soil that the table could hold was 4.01m * 1.9m * 0.2m = 1.5238m3 which was 1523.8 Liters.
According to our plantation plan and the research on those specific plants’ soil requirements, we decided to purchase: 200 Liter of black soil (obi torfrei 45L×23) + 500L of perlite (100L×5) + 200L of fine cut pumice (Lavaflor Mineralische Bodenabdeckung 20kg×10)

Fig - 9 A sketch of the plant bed measurement
Pumice: Pumice helps with aeration of the soil, maintaining softness of the soil and absorbs excess moisture.
Compost: Compost nourishes the plant and enriches the soil with needed nutrients by releasing feed as needed.
Perlite: Holds roots of plants, provides aeration and reduces the chances of root rot. For each section of the plant bed, we have searched and determined soil material percentages for each specific plant and prepared our soil mixtures accordingly.
Strawberries and Radish: Strawberries are picky plants when it comes to their soil preferences. They like acidic soil that drains very well and they need lots of nutrients as they grow and develop. Radish however is less picky but known to thrive better on similar soil mixture as strawberries. Therefore, we have prepared a soil mixture that had every component in equal measurement and planted both species in the same section.5
Parsley and Mint: Parsley and mint both are very easygoing plants and do well in a container/pot environment. Both prefer moderate fertilisation and similar watering needs. Therefore we prepared a soil mixture that consists of 60% black soil, %30 compost, %10 perlite for drainage and acidity.
Arugula and Spring Onion: Arugula and Spring Onions prefer nutrient-rich, well-drained soil but are very tolerant plants. They tend to germinate slightly colder soil than any other plants in our lists so we decided to plant them together. We used %40 black soil, %30 compost, %15 pumice and %15 perlite to maintain good drainage, aeration and acidity of the soil.6
The position of the plants was illustrated in Figure 10

Fig - 10 illustration of the plant species as seen from above.
3. Results: (Ayday Myrzabekova)
The outcomes at the end of the project aligned closely with all the desired objectives that were aimed for at the beginning of the project, such as optimal temperature with consistent humidity through the winter months. Table 1 illustrated the average values of key parameters measured, with the initial value of November 26, 2023, and the final values measured on January 16th, 2024. Furthermore, the project accomplished easy and direct access to water, electricity, and the Internet via underground pipes and the panels constructed inside the greenhouse. Figure 11 showed pictures of the greenhouse at the complete beginning of the project (Left) and at the end (Right).
Table 1: Key parameters at the beginning and end
| Parameter | Ave. value at beginning | Ave. value at end |
|---|---|---|
| Temperature | 7.9°C | 30°C |
| Humidity | 90.5% | 35% |
| Light (during night) | 0lx | 70 -100lx |
4. Discussion: (Ali Akuri-Eyambe)
The results from the project showed the success of the objectives that were set at the beginning. Keeping the optimal temperature for plant growth consistent was crucial, especially through the winter months. Both temperature and humidity were important factors influencing and conducive to plant growth, irrespective of the species.
Table 1 provided an overview of the average values of key parameters measured at specific times during the project. The electric heaters were necessary for the values in the table for the temperature but also helped in maintaining consistent humidity. The cold temperatures of winter would cool the air in the greenhouse, raising its humidity to above-desired levels.
One of the hardest but noteworthy achievements of the project was the establishment of direct access to water, electricity, and the internet—essential resources. The in-pipe system and panels inside the greenhouse not only ensured a stable supply of resources but also contributed to making the whole system sustainable and self-reliant, a major goal of the project.
The before-and-after images in figure 11 illustrated the transformative effect the project had on the greenhouse. From the construction of the FarmBot to the ease of access to water and electricity, the greenhouse was positively impacted by this project.
However, some limitations encountered during the project are also mention-worthy. Building the FarmBot took longer than expected, as some parts needed to be manufactured again due to technical difficulties in sizing and fitting certain pieces in certain positions. Moreover, because of the very cold winter conditions, the ground that was dug up from the trench froze and couldn't thaw out in time, necessitating the acquisition of extra bags of earth to fill it up.

Fig - 11 the greenhouse before and after the Farmbot
5. Conclusion: (Ayday Myrzabekova)
In conclusion, the outcomes of this part of the project met the envisioned objectives, emphasizing the potential of integrating technology into farming. Possible ways of enhancing the project would be using solar panels for electricity and integrating extra sensors to measure other vital parameters. This extra data could be used to improve specific aspects for better quality and higher yields. Not only would this make the greenhouse completely self-reliant but also self-improving, all contributing to the main goal of making it fully autonomous.
6. References:
1. Farmbot [@farmbotio]. (2024, January 15). Another shot of this thriving garden grown by an indoor #FarmBot Genesis XL 🥬 🍅 “We’ve raised and strengthened our lights, and finished another harvest.” [Retweet]. Twitter https://twitter.com/farmbotio/status/1565414760472092672
2. Abbu, M., Al-Ataar, A. A., Abd Alrahman, S., & Al-Gburi, M. (2023). The mechanical properties of lightweight (volcanic pumice) concrete containing fibers with exposure to high temperatures. In Journal of the Mechanical Behavior of Materials (Vol. 32, Issue 1). https://doi.org/10.1515/jmbm-2022-0249
3. Compost Science and Technology. (2007-09-14). https://doi.org/10.1016/S1478-7482(07)X8002-3
4. Taha, F. M. A., Osman, A. A., Awadalkareem, S. D., Mysoon S.A. Omer, & Saadaldeen, R. S. M. (2018). A Design of a Remote Greenhouse Monitoring and Controlling System Based on Internet of Things. In 2018 International Conference on Computer, Control, Electrical, and Electronics Engineering (ICCCEEE). https://doi.org/10.1109/iccceee.2018.8515866
5. Pearce, M. (2023, September 27). How to grow strawberries in a greenhouse. Access Garden Products. Retrieved January 13, 2024, from https://www.garden-products.co.uk/news/growing-under-glass/how-to-grow-strawberries-in-a-greenhouse/#:~:text=Strawberry%20varieties%20suitable%20for%20a%20greenhouse&text=Albion%3A%20Albion%20is%20a%20popular,consistently%20throughout%20the%20growing%20season
6. Walker, A. (2023, October 5). Arugula is bold, but amicable: a companion planting guide. PLANTS CARE. Retrieved January 13, 2024, from https://theplantbible.com/arugula-companion-plants/